


DOG LOVERS
HOLLY BANDANA
As die-hard animal lovers, especially dog lovers, it all started as a joke before we decided that it would be really cool to sew celebrity outfits for our best canine friends.


DIFFICULTY LEVEL
Very easy. This bandana pattern is perfect for beginners. There are no particular challenges to be faced with this pattern.
COMPLETION TIME
2 and a half to 3 hours depending on your sewing level and your mood of the day!
SEAM ALLOWANCES
Seam allowances are always included and visible with us. They are 1 cm for our bandana < holly >
MATERIALS REQUIRED
Supplied in the sewing kit:
- The sewing pattern is printed in large format and ready to use: no need to trace the pieces. They do not overlap and the seam allowances are included. Delivered in its cardboard pouch < disclothed > paris
- The selected fabric
- A spool of Gütermann brand thread (100 m), in a color matching the selected fabric
- A <disclothed> Paris sewing label, woven in the south of France
Not supplied in the kit:
- A sewing machine
- A pair of paper scissors
- A pair of fabric scissors
- An iron
- A box of sewing pins
- A safety pin
- A seam ripper, just in case
SIZE GUIDE
| Size | Neck circumference (cm) | Neck circumference (inches) |
| XS | from 20 to 29 cm | 7 7/8 - 11 3/8 |
| S | from 30 to 39 cm | 11 13/16 - 15 23/32 |
| M | from 40 to 49 cm | 15 3/4 - 19 1/4 |
| L | from 50 to 60 cm | 19 11/16 - 23 5/8 |
To measure your dog's neck circumference, take a tape measure and place it where you want the bandana to be. Don't tighten it, and don't leave any extra room either; our pattern already includes a room so you can easily tie your bandana around your beloved dog's neck.
If you have any questions, please feel free to email us at hello@disclothed-paris.com and we will get back to you within 24-48 hours.
FABRIC CONSUMPTION
Please note, always allow 5-10% more than what we indicate in this table - depending on your fabric's ability to shrink.
| Size | For a width of 1.50 m |
| XS | 0.30 m |
| S | 0.30 m |
| M | 0.45 m |
| L | 0.65 m |
MOUNTING RANGE
INSTRUCTIONS
Would you prefer to read us? Find all the illustrated instructions for
sew the bandana < holly > in the assembly range below.
1. Getting Started
Let's go for a little sewing time together! Unpack your ready-to-sew kit and thread your machine with the provided spool of Gütermann thread: first fill your empty bobbin, then thread your machine, carefully threading the thread into each nook and cranny provided.
2. Cut out the pattern and the different pieces in the fabric
- Measure your dog's neck circumference as explained above (paragraph "Size Chart") and cut out the pattern for the Flag and the corresponding Collar.
💡 There are 4 different sizes of Flag. Cut the Flag that corresponds to your dog's size: XS, S, M or L. For the Collar, there are 2 different widths. A thinner Collar for sizes XS and S, and a wider Collar for sizes M and L. If your dog has a neck circumference of 38 cm for example (size S), you will cut the Flag in size S, and the Collar the less wide. Locate the "38 cm" line on the Collar and cut there to obtain the correct length of Collar.
- Pin the "Flag" and "Collar" pieces to your fabric, as detailed in the provided cutting plan
⚠️ We pin the Flag well "on the fold", as indicated on the pattern. The pieces cut on the fold allow us to actually obtain pieces twice as large and perfectly symmetrical once unfolded. In our case, we will therefore obtain a diamond once we have unfolded
- Cut out the 2 pieces of fabric using your fabric scissors this time, taking care to follow the pattern lines perfectly.
✅ Remember that seam allowances are always included in < disclothed > paris patterns, so there is no need to leave a margin around the pattern outline.
❓ What is a seam allowance? When you join two pieces of fabric together, 1 cm from the edge for example, you end up with a margin of 1 cm between the edge of your fabric and your stitching. This is called the "seam allowance", also called "seam allowance".

➡️ Saying that the seam allowance is included in our patterns means that the outline of each piece of our patterns represents the cutting line (the edge of the fabric) and not the sewing line (where you sew). In patterns without a seam allowance included, you must therefore draw a line yourself (0.7 cm, 1 cm, 1.5 cm from the edge, depending on what is indicated) before cutting.
- Before unpinning, mark the 2 notches of the Flag using your pair of scissors
❓ What is a "notch"? A notch is a reference point that will help us when assembling (they are small lines in our case, but they can also be represented by triangles). You must therefore "mark your notches" when cutting your pieces so that you can find them later.
❓ How to "mark a notch"? To mark a notch, simply take your scissors and make small cuts at the notches, 0.5 cm long (no more!). Our seam allowances are 1 cm, so we won't see these "notches" after assembly, but they will simply serve as guidelines for assembling.
- Iron the pieces obtained, carefully following the care instructions for your fabric – we advise you to always test the heat of your iron on a scrap
💡 Good to know: no need to overlock/serge your pieces because you will see that all the edges will end up on the inside of the bandana < holly > at the end. There is therefore no risk of the fabric fraying over time.
3. Flag Flaps
Our flag, once unfolded, has the shape of a diamond.
- Stand on the back of the flag
- Fold the corners located at the notches inwards: fold at the notches
- Iron to mark the folds

- Pin the small triangles thus formed so that they stay in place
- Set your machine to “straight stitch” mode and test your thread tension and stitch length on a piece of scrap fabric.
- When you're happy with the settings, sew with a straight stitch, 1 cm from the edge at the fold. Don't forget to backstitch at the beginning and end, and trim any excess threads.
❓ What is a backstitch? A backstitch is basically like tying a knot when sewing by hand. Backstitching is done every time (with some exceptions) you start and finish a stitch to secure the seam.
❓ How to make a backstitch? To make a backstitch, simply machine-stitch your fabric normally over 3 stitches, then reverse over these same 3 stitches before continuing your stitching forward. When you reach the end of the stitch, we make another 3 stitches backward to make the final backstitch. Going over these 3 stitches on the machine allows us to tie the threads together and therefore secure our seam.
- Cut the 2 small triangles that protrude (cut along the stitching) to avoid excess thickness
- Iron everything to flatten the seams well.

4. Inserting the label into the Flag
If you simply downloaded the pattern in PDF format, you obviously don't have a fabric label! So you do exactly the same thing, but without a label :)
- Turn the Flag right side out and fold it in half, right sides together, following the line of our starting fold.
- Insert the <disclothed> paris textile label provided in the kit between the two layers of fabric: you can position it wherever you want - more or less close to the tip of the Flag, there is no rule. However, be careful to have the "white" side of the label - without the logo, against the edge of the fabric: it is indeed this part that we want to take in the seam, and not the logo:

- Pin along the entire length of the flag, making sure to also pin the label that we just slipped inside the two layers. Check that the logo remains clearly visible if you pin it 1 cm from the edge before pinning.
- Still using a straight stitch, stitch 1 cm from the edge all the way along: start and finish stitching at the notches. Don't forget to stop at the beginning and end, and cut off any excess threads.

❓ How to sew a corner? It's very simple: straight stitch all the way to the corner, 1 cm from the edge of the fabric (the value of our seam allowances). Leave the needle in the fabric at this point, raise the presser foot, pivot the fabric and lower the presser foot to continue.
⚠️ Be careful to stay precise, especially when sewing the label: if you sew more than 1 cm, the logo may not be fully visible on the right side.
- Trim the corner and iron
❓ What does trimming a corner mean? Trimming your corners is essential when sewing. Trimming a corner simply means "removing material" from the corner. Since we're sewing right sides together, trimming our corner will help us turn our work properly. Without it, the excess material trapped inside (= our seam allowances) would prevent us from obtaining a clean and flat corner.
❓ How to trim a corner? Nothing could be simpler: remove some material once by cutting diagonally in your fabric, as close as possible to your stitching (1 or 2 mm). Then cut a little more material on the sides, at an angle.

⚠️ Be careful not to cut too close to the stitching, or you risk making a hole. If your fabric frays a lot (as is the case with our red or white textured wools/viscose), we recommend cutting a good 2 millimeters from the stitching.
- Turn the flag right side out, inserting it completely through one of the two openings. To help you, use a pointed but not sharp object (e.g., a pencil) to help you form the right angle of the flag.
➡️ This step takes time if you are working with the thick fabrics that we provide in our kits: you have to manage to get the whole Flag through a very small opening, but take your time and everything will go well!
- Once turned inside out, our <disclothed> paris label appears on the right side
- Iron to flatten the seam well

⚠️ Make sure to bring out the seam at the edge of the Flag. This is not easy with thicker fabrics that tend to "roll" inwards: the < disclothed > paris label can end up more or less hidden by the 2 layers of fabric if the ironing is not done well, and the shape of the Flag can end up more elongated than expected. If you are not sure how to do this, we recommend watching our tutorial video (higher up on this page)
💡 Good to know: ironing can seem tedious and when you start sewing, we often tend to skip this step. If this is you, do yourself a favor! Ironing each stitch thoroughly at each stage of the sewing process will have a considerable impact on the final result of your work :)
5. Flag Stitching
We will now topstitch all the way along to get a nicely structured cut and keep the Flag flat:

- Stitch 1 cm from the edge, all along the bottom of the flag. As usual, don't forget to backstitch at the beginning and end. Also take your time to create a nice angle, in the same way as before.
- Cut off any excess threads and iron
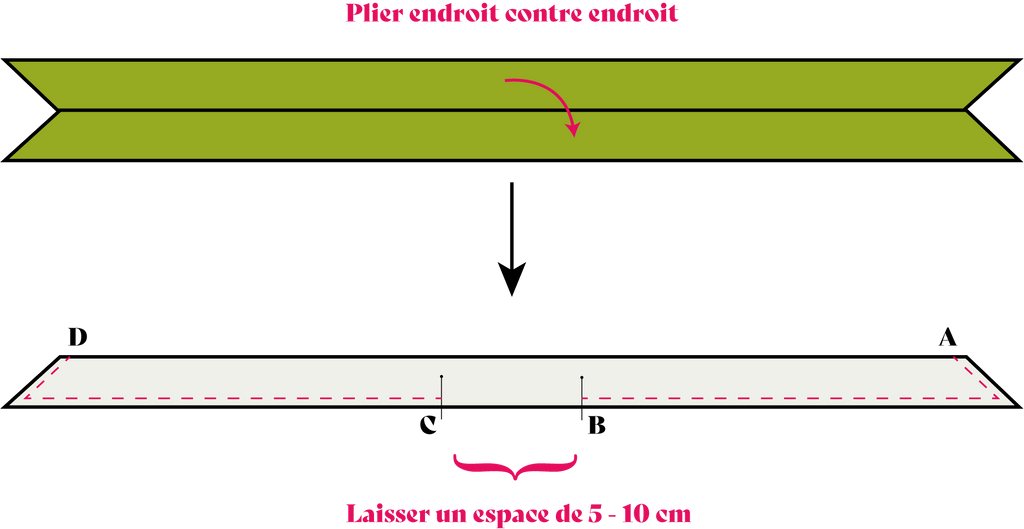
6. The Necklace
- Fold the necklace in half lengthwise, right sides together and edge to edge.
- Iron to mark the fold well
- Pin all the way through, leaving an opening in the middle of about 10-15 cm (only 5-10 cm may be enough for thin fabrics)
➡️ This space will allow us to completely turn our necklace right side out. We will actually stitch all the way down, but we will leave a few centimeters unstitched.
💡 Tip: we advise you to put 2 pins instead of one, at the 2 ends of your hole so as not to miss it when pricking (it happened to us a lot of times! Without realizing it, we had pricking all the way through without leaving an opening, so we could no longer turn our Necklace over)
- Insert your needle at point A, 1 cm from the edge. We start as usual with a backstitch, and we pay attention to go right to the edge by going backwards, before going forward again.
- Continue to straight stitch 1 cm from the edge until you reach point B, where you will make another backstitch. Repeat the same process as before to stitch at the corner.
- Make a second stitch starting from point C this time, up to point D. Again, we make a backstitch to start, we apply it in the corner, and we finish with a backstitch to secure our stitch.
- Trim the corners of the Collar in the same way we did earlier with the Flag
- Turn the necklace right side out, passing it completely through the opening we left. Use your pointed object again to shape the corners.
- Iron carefully, flattening the seams with the iron.
Now that our necklace is in its right place, we now need to close the hole that we left: to do this we will simply stitch along this opening, as close to the edge as possible this time:
- Very simply, come and stitch your necklace at the opening, as close to the edge as possible. This is called a rib stitch. We start and finish as usual with a backstitch.
- Cut off any excess threads and iron again.

❓ What is a ribbed stitch? It is a decorative stitch, also called a "hair stitch" (but it's rare honestly), which is sewn 1 or 2 millimeters from the edge of a fabric (or a fold). Beyond its purely decorative function, the ribbed stitch can be used to reinforce a seam, to keep a seam lying in one direction, or even to flatten an area (our case here with the < holly > bandana for example)
❓ How to make a rib stitch? We position ourselves on the right side of our work and we come to sew with a straight stitch, all along our fold or our seam, at a distance of 1 or 2 millimeters. There is therefore nothing very complicated, the only difficulty with the rib stitch is to make it as regularly as possible (perfectly parallel to our mark)
💡 Please note that it is also possible to close this opening using an invisible stitch, but this is not absolutely necessary in our case.
- It is also possible, if you wish, to topstitch your collar along its entire length, as we did with the Flag. In this case, we recommend doing this stitching in one go. It will therefore be both decorative and useful - to close the opening
7. Final Step!
All you have to do is slide the Necklace inside the Flag:
- Using a safety pin, pin one of the 2 ends of the necklace
- Slide the Necklace into the Flag through one of the Flag's two openings. The safety pin is simply a guide: we slowly slide the pin inside with our little fingers 🤏
- Make sure the necklace stays flat inside, then remove the safety pin once it comes out the other side
- Final ironing of the bandana < holly >

Well done !
We hope you had a good time with us.
All you have to do is tie your 100% homemade bandana < holly > around your beloved dog's neck 🐕
If you have any questions about this model, please do not hesitate to contact us, we are here to help you: hello@disclothed-paris.com .
Finally, don't forget to tag us on Instagram with the hashtags #disclothedbyme and #bandanaholly . We love seeing your creations!
PS: If you have a closed Instagram profile, we can't see your photos even if you tag us. Feel free to share your photos with us via private message in this case!
We can't wait to see the result 🖤


