


KOREAN VIBES
HANBOK SHIRT
Inspired by the traditional Korean garment of the same name — 한복 — our iconic


DIFFICULTY LEVEL
Fairly easy. The< hanbok > shirt is accessible to beginner sewists who have already completed a few projects, such as our < 90’s > scrunchies or our< holly > bandana
COMPLETION TIME
6 to 7 hours. We recommend working on your project over two separate days : one day for preparing all the pieces (cutting your pattern and fabric), and another day for sewing and assembling everything on your machine.
SEAM ALLOWANCES
Seam allowances are always included and visible on our sewing patterns. They are 1 cm here
POSSIBLE FINISHES
We offer you two different finishing options for this pattern:
- Faced finish : This very simple and common sewing technique gives your collar a neat and elegant look.
- Raw edge finish : Here, the fabric is left to fray slightly at the edges, creating that “unfinished” Margiela-inspired effect we love. This finish will evolve over time, which is completely normal. Don’t hesitate to trim the threads from time to time if they become too long. This technique works with so-called “woven” fabrics (not knits), meaning fabrics made with a warp and weft structure
REQUIRED MATERIALS
Included in the sewing kit :
- The < hanbok > shirt sewing pattern, printed in large format and ready to use: no need to trace the pieces. The pattern pieces do not overlap, and seam allowances are included
- The fabric — a 100% organic cotton batiste, GOTS certified and made in France 🇫🇷 (see details in the “Composition & Care” section below)
- 3 pearly heart-shaped buttons, made in Italy
- A piece of woven fusible interfacing from Vlieseline
- A 100m spool of black thread from Gütermann
- A < disclothed > paris label to sew in, woven in the south of France
- A technical sheet including the cutting plan and QR codes redirecting you to the digital assembly guide and the complete video tutorial
Not included in the kit :
- a sewing machine equipped with a buttonhole presser foot (normally supplied with the machine)
- a pair of paper scissors
- a pair of fabric scissors
- an iron
- a box of sewing pins
- a sewing needle
- a tape measure or ruler
- a chalk pencil or tailor's chalk
- a seam ripper, just in case !
FABRIC CONSUMPTION
Please note, always allow 5-10% more than what we indicate in this table - depending on your fabric's ability to shrink.
| Width 1.40 m | Width 1.55 m | |
| Size 34 | 1.40 m | 1.30 m |
| Size 36 | 1.60 m | 1.30 m |
| Size 38 | 1.70 m | 1.30 m |
| Size 40 | 1.70 m | 1.30 m |
| Size 42 | 1.70 m | 1.30 m |
| Size 44 | 1.70 m | 1.40 m |
| Size 46 | 1.90 m | 1.40 m |
ASSEMBLY RANGE
INSTRUCTIONS
Prefer reading ? Find all the illustrated instructions for sewing the < hanbok > shirt in the assembly guide below
1. Getting Started
Let’s sew together ! Unpack your ready-to-sew kit and thread your machine with the included spool of Gütermann thread your machine with the included Gütermann spool: first wind the empty bobbin, then thread your machine, carefully following each guide.
2. Cut out the pattern and the different pieces in the fabric
- Cut out each pattern piece. If you’ve chosen the raw edge finish, you can skip cutting the facing pieces (6, 7, and 8)
- Place the fabric right side up and pin each piece according to the cutting layout provided, making sure to follow the grainline grainline
- Cut out each fabric piece carefully along the pattern lines. Remember, seam allowances are included in < disclothed > paris patterns, so no extra margin is needed
- Fuse the two facings and the back neckline interfacing
⚠️ Always follow your fabric’s care instructions. We recommend testing your iron’s heat on a scrap first
➡️ Avoid using steam when fusing, as it can prevent the adhesive from sticking properly. Press the iron gently onto each area for 10 seconds without sliding
- Mark all notches with your scissors, and use tailor’s chalk to mark the button and buttonhole placements
- Unpin and press each fabric piece before proceeding
3. Facing version : overcasting the pieces
Skip this step if you chose the raw edge finish. For that version, only overcast the necessary edges as you assemble.
- Finish each piece with a zigzag stitch on your sewing machine, or use a serger if you have one. Always test your stitch length and thread tension on a scrap of fabric first to make sure your settings are correct.
💡 Good to know : The zigzag stitch “encloses” the edge of the fabric to prevent fraying. It’s used on woven fabrics. When you select the zigzag stitch, the needle alternates between sewing into the fabric and just beside it, effectively trapping the threads.
❓ How to make a zigzag stitch?
- Place the edge of your fabric in the center of your presser foot. As with straight stitching, always start and end with a backstitch
- Start with your machine set to straight stitch and move the needle slightly to the left so it enters the fabric, not the air
- Insert the needle into the fabric 1 cm from the edge and sew three backstitches to secure
- Lift the needle and switch to zigzag stitch mode. Sew along the edge with the zigzag stitch
- At the end, switch back to straight stitch with the needle still slightly to the left and finish with three backstitches to secure the seam

❓ How to overlock a corner? It's very simple: Sew along the edge until you reach the corner. Stop with the needle down in the fabric, then lift the presser foot. Pivot the fabric 90 degrees, lower the presser foot, and continue overlocking along the next edge.
4. Facing version : assembling the facings to the back neckline shape
Skip this step if you chose the raw edge version
- Pin the two facings to the back neckline shape, right sides together

- Sew them together with a straight stitch, 1 cm from the edge. Remember to backstitch at the beginning and end, and trim any excess threads
- Press the seam allowances open with your iron
5. Shoulder seams
- Pin the Right Front and Left Front to the Back, right sides together, aligning the shoulder edges

- Sew the shoulder seams with a straight stitch, 1 cm from the edge. Make sure to backstitch at the beginning and end, and trim any excess threads
- Raw edge version : since you didn't overlock your pieces earlier, now overlock these two shoulder seams using a zigzag stitch or a serger. Overlock both layers of fabric together; if needed, even out the edges with your scissors before overlocking
- Press the shoulder seams, pressing the seam allowances toward the back
6. Facing version : attaching the facing to the body
Skip this step if you opted for the raw edge version
- Pin the facing to the bodice along the neckline, right sides together, making sure all notches align
➡️ The center notch of the back neckline facing should match the center back notch, and the shoulder seams of the facing should align with those of the bodice. Take your time with this step—precise pinning makes a big difference in the final result

- Sew with a straight stitch, 1 cm from the edge, backstitching at the beginning and end. Start at the bottom edge of one front, sew all the way around the neckline, and finish at the bottom edge on the other side
⚠️ Be mindful of seam allowances: for the bodice, press them toward the back; for the facing, press them open
💡 Good to know : Following the direction of seam allowances helps avoid excess bulk. In general, seam allowances are pressed toward the back and/or downward. We open seam allowances with an iron when we want to distribute the fabric evenly, as with the facing
⚠️ Take extra care at the collar corners and when sewing around curves—slow down for a neat finish, especially if you’re a beginner
- Trim excess threads and clip the collar corners
💡 Good to know : trimming corners is essential for a crisp finish. Trim diagonally across the corner, as close as 1–2 mm from the stitching, then trim a bit more off the sides at an angle. Be careful not to cut into the stitching
❓ How to trim a corner? It’s very simple! First, trim off the tip of the corner by cutting diagonally across the fabric, as close as 1–2 mm from your stitching line. Then, remove a bit more fabric from each side of the corner, again cutting at an angle. Be careful not to cut too close to the stitching, or you risk making a hole in your seam

- Turn your work right side out, making sure the collar corners are sharp, and press the seams flat along the fronts and neckline.
💡 This step is crucial and may take some time — pressing well ensures your garment looks professional and lasts longer
- To keep the facing in place, hand-stitch it at the shoulder seams : use a needle and thread to tack the facing to the seam allowance at each shoulder, making a few stitches and knotting securely
7. Side seams
- Pin the sides of the two Front pieces to the Back, right sides together, making sure the notches under the armholes are aligned

- Sew the side seams with a straight stitch, 1 cm from the edge. As always, backstitch at the beginning and end, and trim any excess threads
- Raw edge version : Now overlock these two side seams using a zigzag stitch or a serger. Overlock both layers of fabric together; if needed, even out the edges with your scissors before overlocking
- Press the seams, folding the seam allowances toward the back on both sides
8. The sleeves
- Fold each sleeve in half lengthwise, right sides together, and pin along the edge

- Sew the sleeve seam with a straight stitch, 1 cm from the edge. Don’t forget to backstitch at the beginning and end, and trim any excess threads
- Raw edge version: Overlock the entire seam using a zigzag stitch or a serger. Overlock both layers of fabric together, and if needed, even out the edges with scissors before overlocking
- Turn the sleeves right side out and press, flattening the seam well along the length
9. Armholes
Now we’ll attach the sleeves to the bodice, making sure to match right and left sleeves correctly. Here’s how to avoid confusion :
- Place your < hanbok > shirt inside out, and keep both sleeves right side out
- Find the small notches you made earlier: the single notch on the sleeve should match the shoulder seam, and the double notch on the sleeve should match the double notch on the front
➡️ When starting this step, it can be tricky to visualize how everything fits together. Take your time to identify the Right Front, Left Front, Right Sleeve, and Left Sleeve. Use the notches as guides, and check which pieces are right side out or wrong side out. Refer to the diagrams and tutorial video for extra help 💖

➡️ If you find that the sleeve cap seems too large for the armhole, don’t worry—this is called “ease.”
❓ What is ease ? Ease is a little extra fabric built into a pattern to make certain areas more comfortable or to add shape, like a slight puff at the sleeve cap. At the armhole, a bit of ease is normal and ensures you can move comfortably in your blouse. On the < hanbok > shirt, the armholes are wide and there’s very little ease, so it’s easy to manage
- Once you’ve matched the notches and managed the ease, pin the sleeve into the armhole, right sides together, making sure
- The double notches on the front match the double notches on the sleeve
- The sleeve seam matches the side seam (under the arm)
- The sleeve head notch matches the shoulder seam
⚠️ When pinning, make sure all seam allowances are pressed toward the back : sleeve seams, side seams, and shoulder seams
💡 Tip : If you’re a beginner, use plenty of pins to help keep everything aligned.
- Sew the sleeve to the armhole with a straight stitch, 1 cm from the edge. Start at the side seam (under the arm) and sew all the way around. Backstitch at the beginning and end, and trim any excess threads
💡 Good to know : Starting and ending your stitching at the underarm helps reinforce this area, which is prone to wear
💡 Sewing machine tip : Remove the accessory compartment from your sewing machine to make it easier to sew around the armhole and avoid pulling on the fabric
- Raw edge version : Overlock both armhole seams with a zigzag stitch or a serger, sewing through both layers together. Even out the edges with scissors if needed before overlocking
- Press the seam allowances of the armholes toward the bodice
10. Sleeve hems / raw edge finishes of the sleeves
➡️ See below for the raw edge version
The < hanbok > shirt is almost finished ! Now it’s time to finish the sleeve hems for a neat result.
- Turn your < hanbok > shirt inside out
- Facing finish : Fold the bottom edge of each sleeve up by 1 cm to the inside and press to mark the fold.
⚠️ The sleeves on the < hanbok > shirt are intentionally very long and flared — they cover part of your hands. If you prefer, you can shorten them to your desired length. We recommend trying on the blouse before marking your hem folds to make sure both sleeves are even, as small differences from cutting or sewing may have occurred.

- Fold the bottom edge up another 1 cm to the inside, press, and pin all around, making sure the seam allowances are pressed toward the back. This creates a double-fold hem
- Sew the double hems with a straight stitch, 0.7 cm from the edge, starting at the sleeve seam and sewing all the way around. Always start and finish with a backstitch
- Press the hems well to flatten the seams
➡️ For the raw edge version, you obviously don't need to hem the sleeves !
- Raw edge finish : simply sew around the bottom of each sleeve, 1 cm from the edge, using a straight stitch and backstitching at the beginning and end. This will help prevent the fabric from fraying beyond the stitching
11. The hem / raw edge finish of the bottom of the garment
➡️ See below for the raw edge option
- Finishing the facing : stand in front of your garment and open up the front panels and facings as shown in the diagram below. (For clarity, the illustration doesn’t show the shoulder seams, but yours will of course have them!)
- Make a 1 cm pleat at the bottom of the blouse and press it with an iron to create a crisp fold

- Fold the hem up by 1 cm and press, then fold it up again by another 1 cm to create a double hem, just as you did for the sleeves. Press and pin the hem in place all the way across, making sure the side seam allowances are pressed towards the back
- Next, fold the facings down while keeping the hems you just pressed in place, and pin everything again
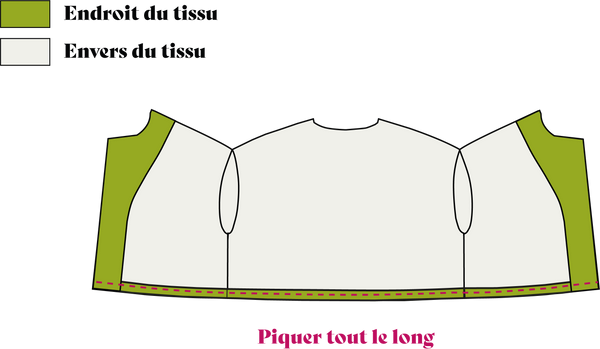
- Sew the facings in place with a straight stitch, sewing 0.7 cm from the edge. Remember to backstitch at the beginning and end. Press the finished hem to flatten the seams
➡️ For the raw edge version, you obviously don't need to hem the bottom !
- Raw edge finish : As with the sleeves, simply sew a straight stitch 1 cm from the edge, all the way around the hem, starting at one of the side seams (either right or left) and continuing around the entire garment, including the collar. Don’t forget to backstitch at the start and finish, as usual

💡 Good to know : With this method, your fabric edges may fray over time. The stitching you just added will stop the fraying from going any further. You can even fray the edges by hand to achieve the look you want.
12. The Buttonholes
Now let’s move on to making the buttonholes :
- Switch to the buttonhole presser foot (this usually comes with your sewing machine)
- Before working on your garment, test the buttonhole settings on a scrap of your fabric, using two layers to mimic the real conditions
- Set your machine to the buttonhole stitch and adjust the stitch length between 0 and 1, fine-tuning as needed based on your tests.
➡️ Our heart-shaped buttons are 1 cm tall, so your buttonholes need to be slightly larger to allow the button to pass through easily. Find the notch on your presser foot that works best; for us, it’s the third notch. If this is your first time making buttonholes, we recommend watching our tutorial video to see the process in action and ensure you’re using the right technique
💡 Good to know : These instructions are for making buttonholes on a standard home sewing machine. Many higher-end models now have an automatic buttonhole function, which makes the process even easier—just press a button and the machine does the rest. We won’t cover those machines here, as if you’ve invested in one, you likely already have some experience with buttonholes
- Once you’re happy with your test buttonholes (and only then), return to your actual garment and proceed

- Place your needle at the mark for the first buttonhole, in the top left corner. Set your machine to buttonhole stitch mode 1 and position the buttonhole presser foot so that the opening matches the size you want for your buttonhole
- Gently press the foot pedal and guide the fabric without pulling or forcing it, letting the machine sew down to the bottom left corner of the buttonhole. The machine will complete this step automatically :

- Once you reach the bottom of the buttonhole, with the needle fully raised, switch your machine to buttonhole stitch 2. Sew a few back-and-forth stitches to secure the end. You will now be at the bottom right corner of the buttonhole :

- Next, switch to buttonhole stitch 3. Sew up the right side of the buttonhole, carefully stopping when you reach the top right corner :

- Finally, switch to buttonhole stitch 4 (which is the same as stitch 2) and sew a few back-and-forth stitches to secure the top of the buttonhole. This will complete your buttonhole at the top right corner

- Finally, raise the needle and trim any excess threads
- Place two pins at the start and end of the buttonhole to prevent accidentally cutting through the bar tacks
- Using a seam ripper, carefully open the buttonhole by cutting along its center, following the marked line. For best results, insert the seam ripper into the middle of the buttonhole and cut towards each end separately, stopping at the pins to avoid damaging the stitches at either end
💡 Good to know : These two pins act as guides to prevent the seam ripper from going too far and accidentally cutting through the bar tacks at the ends of the buttonhole. This helps ensure you don’t tear or damage the buttonhole while opening it

- Remove the pins—the buttonhole is complete!
- Repeat these steps for the remaining two buttonholes, then press everything with an iron to finish
13. The Buttons
It’s finally time to sew the heart buttons onto your < hanbok > shirt :
- Lay the two front panels on top of each other to check the placement of the button marks you made with chalk at the beginning. If needed, adjust the button positions so they line up perfectly with the buttonholes you just made
➡️ Your original markings may no longer be perfectly aligned if your stitching varied slightly. If that’s the case, don’t hesitate to try on the blouse and adjust the button placement. The most important thing is that the buttons are correctly aligned with the buttonholes in the end.
- To sew buttons by hand, start by bringing your needle up from the right side of the fabric, so the small knot will be hidden under the button (and not visible on the inside of the blouse). Do the same for your finishing knot — tie it off on the right side, under the button, to keep it discreet
- Trim away any excess threads and repeat this process for the remaining two buttons
➡️ You can also sew your buttons on with a sewing machine. Since the process depends on your machine model and its accessories (such as a special button foot, retractable feed dogs, or a cover plate), we recommend consulting your sewing machine’s manual for detailed instructions
14. Final Touch !
- To finish your < hanbok > shirt, attach the < disclothed > paris textile label provided. Place it exactly in the center, on the facing : sew only through this single layer (without stitching through to the back), so that the stitches are not visible on the outside of the shirt
- Place it right in the center, on the Facing : we only sew this thickness (without crossing the back) so that the seams are not visible on the outside of the blouse
➡️ For the raw edge version, since there is only one layer of fabric, simply sew the label directly onto the back of the < hanbok > shirt
- Using a needle, make four small hand stitches—one at each corner of the label. For a neater finish, place the stitches right on the small folds at the corners of the label, so they remain invisible from the front (we admit, we’re a bit meticulous about this!)
- Finish by giving your hanbok blouse a final press with the iron
Bravo !
We hope you enjoyed this project with us !
You can be proud—you’re now the happy owner of a 100% handmade piece.
If you have any questions about this pattern, please don’t hesitate to reach out — we’re here to help : hello@disclothed-paris.com.
And don’t forget to tag us on Instagram using #disclothedbyme and #chemisierhanbok — we love seeing your creations !
P.S.: If your Instagram profile is private, we won’t be able to see your photos even if you tag us. In that case, feel free to send your pictures via direct message — we can’t wait to see the results ! 🖤


